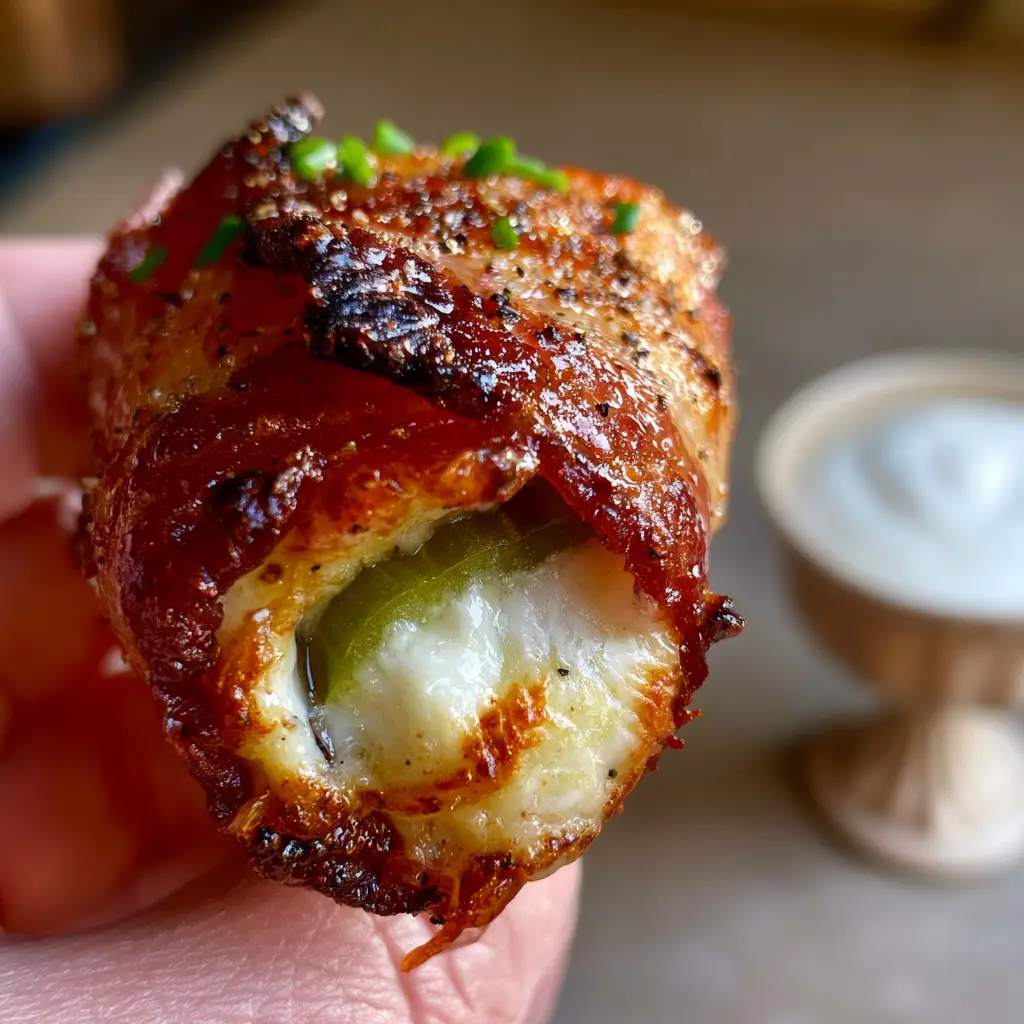
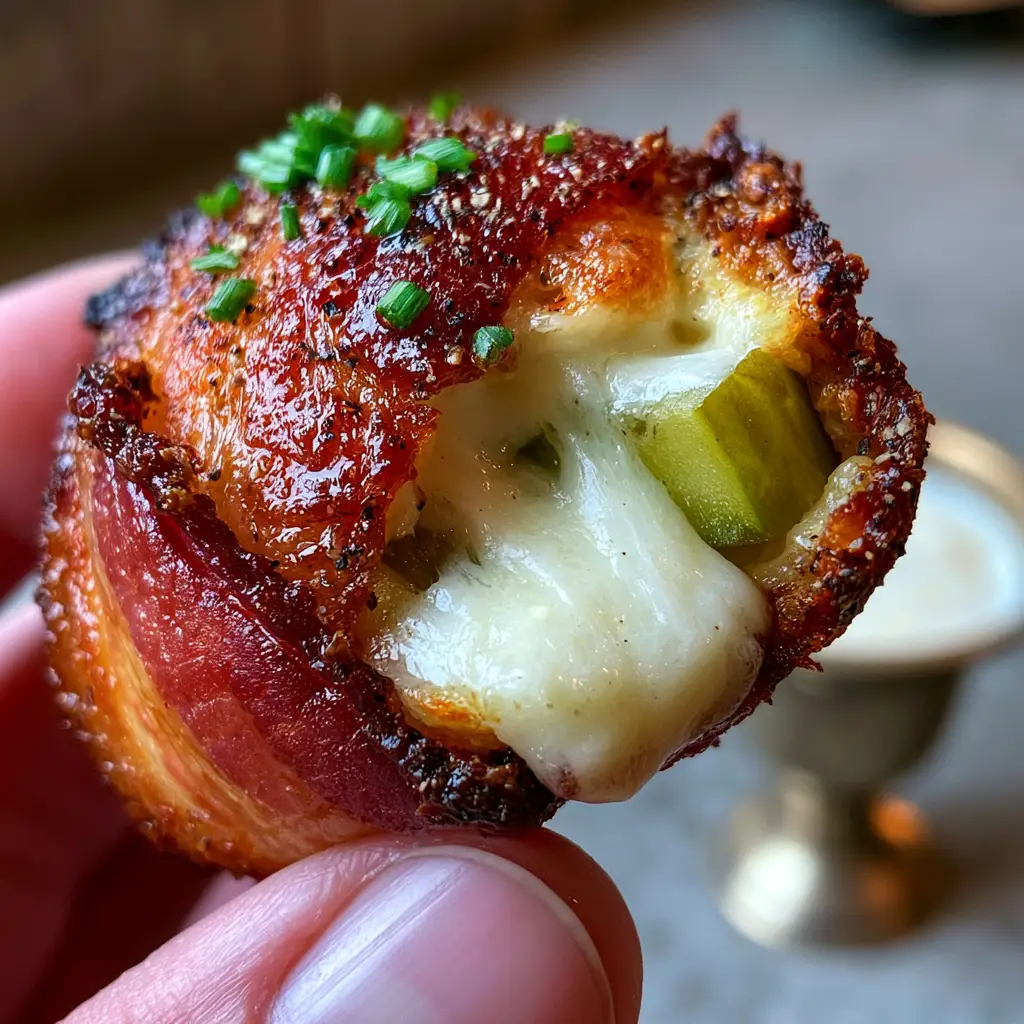
There is a specific, Pavlovian response that happens when you see a tray of perfectly rendered pickle poppers emerging from the kitchen. Imagine a single, handheld snack that captures the holy trinity of textures: the shattering crunch of mahogany-edged bacon, the yielding snap of a juicy green dill pickle, and the molten, steaming core of savory whipped cream cheese. It is the ultimate social media-worthy appetizer that tastes even better than it looks.
This recipe isn’t just about wrapping meat around a vegetable; it’s about culinary engineering. We are aiming for that hyper-realistic, high-quality aesthetic where every grain of cracked black pepper and every emerald green chive flake stands out against the glistening natural oils of the bacon. Whether you are hosting a high-stakes game day or looking for a low-carb snack that actually satisfies, these poppers deliver a flavor explosion in every bite.
Taking that first bite reveals a contrast that most appetizers can only dream of. The saltiness of the bacon gives way to the vinegary tang of the dill, while the cream cheese acts as a cooling, velvety bridge between the two. Served alongside a thick, elegant ceramic ramekin of creamy ranch dip, these are the snacks that disappear within minutes of hitting the table.
The Irresistible Allure of the Perfect Bacon-Wrapped Pickle
- Shatteringly Crispy Texture: By using specific rendering techniques, we achieve bacon with beautiful charred mahogany edges that crackle upon impact.
- Juicy Dill Center: We select premium green dill pickle spears that retain their snap even after a trip through the high-heat environment of the oven or air fryer.
- Whipped Core Technology: Instead of dense blocks of cheese, we use whipped cream cheese seasoned with cracked black pepper for a lighter, “steaming” interior.
- Vibrant Herbaceous Finish: Finely chopped fresh chives provide a pop of color and a mild onion bite that cuts through the richness of the rendered fat.
Essential Components for Culinary Success
Dill Pickle Spears (6-8 large): Look for the brightest green spears you can find in the refrigerated section, as these maintain the best “crunch” factor when heated. Avoid shelf-stable pickles if you want that juicy, fresh-from-the-vine snap.
Center-Cut Bacon (12-14 slices): Thick-cut bacon is often too heavy and won’t crisp up at the same rate the pickle heats; center-cut provides the ideal meat-to-fat ratio for those glistening, charred edges. Each slice should wrap around the spear at least 2.5 times for maximum structural integrity.
Whipped Cream Cheese (8 oz / 225g): Starting with whipped cream cheese ensures a light, airy texture that melts beautifully without becoming oily or separating. It acts as the “glue” that holds our seasonings in place.
Fresh Chives (1 bunch): These are not just a garnish; they provide the “emerald green” visual contrast and a fresh, sharp flavor profile. Finely chop them until they look like tiny jewels.
Coarsely Cracked Black Pepper (1 tsp / 2g): Avoid pre-ground pepper; you want the large, textured grains that provide a visual “pop” and a punchy floral heat. This creates the “speckled” look that defines a gourmet popper.
Creamy Ranch Dip (1/2 cup / 120ml): A thick, high-quality dipping sauce serves as the cooling agent for the hot, salty bacon. It should be chilled and served in a ceramic ramekin for that elegant presentation.
Must-Have Tools for the Professional Home Cook
To achieve the visual result of “handheld perfection,” you need the right airflow. A standard baking sheet is good, but a wire cooling rack set inside that baking sheet is better. This allows the heat to circulate 360 degrees around the bacon, ensuring the bottom is just as crispy as the top.
You will also need a sharp chef’s knife for those precision chive cuts and a small offset spatula or a butter knife to spread the cream cheese. If you’re aim is social-media quality, have a pair of kitchen tongs ready to rotate the poppers during the final minutes of cooking to ensure even charring.
Engineering the Ultimate Pickle Poppers: Step-by-Step
Phase 1: Preparing the Foundation
Begin by patting your dill pickle spears completely dry with paper towels. This is a non-negotiable step; any surface moisture will steam the bacon from the inside out, preventing it from reaching that mahogany crispness. Once dry, use a small spoon to slightly hollow out the center of the spear if they are particularly thick, creating a “well” for the cheese.
Phase 2: The Whipped Filling and Pepper Crust
In a small bowl, give your 8 oz (225g) of whipped cream cheese a quick stir to loosen it up. Spread a generous layer—about 1 tbsp (15g)—into the center of each pickle spear. Immediately sprinkle the top of the cheese with half of your cracked black pepper, pressing it in slightly so it doesn’t fall off during the wrapping process.
Phase 3: The Precision Bacon Wrap
Take one slice of bacon and start at the very top of the pickle spear. Wrap it tightly in a spiral fashion, overlapping the edges by about a quarter-inch. This “shingling” technique ensures the cream cheese is sealed inside and the bacon stays secure without the need for toothpicks. The final result should look like a tidy, meat-bound cylinder.
Phase 4: High-Heat Rendering
Preheat your oven to 425°F (220°C). Place the poppers on the wire rack and bake for 18-22 minutes. You are looking for a specific sensory cue: the bacon should be glistening, and the edges should turn a deep mahogany brown. For an extra “char,” turn on the broiler for the final 60 seconds, watching closely to avoid burning.
Phase 5: The Emerald Garnish
Remove the poppers from the heat and let them rest for 2 minutes—this allows the cream cheese core to set slightly so it doesn’t run out when you take a bite. While they rest, shower them with the finely chopped fresh chives and the remaining cracked black pepper. The residual heat will slightly soften the chives, releasing their aromatic oils.
The Science of Achieving Mahogany Bacon Edges
- Temperature Control: Cooking at 425°F (220°C) is the “sweet spot” where the fat renders quickly enough to crisp the meat before the pickle loses its structure.
- The Resting Period: Never skip the 2-minute rest. This is when the juices inside the bacon redistribute, ensuring that “glistening” look without the popper being greasy.
- Dryness is Key: If your bacon is pale and flabby, it’s usually because the pickles were too wet. Always double-dry your spears.
- The Wire Rack Secret: Elevating the food allows fat to drip away, preventing the poppers from “frying” in their own grease, which can lead to soggy bottoms.
The Best Way to Store and Revive Your Poppers
If you happen to have leftovers, store them in an airtight container in the refrigerator for up to 3 days. However, do not use the microwave to reheat them; this will turn the bacon rubbery and the pickle mushy. Instead, place them back in a 400°F (200°C) oven or air fryer for 4-5 minutes until the bacon sizzles again.
Freezing is not recommended for this specific recipe. The high water content of the pickles causes them to become overly soft and lose their “snap” once thawed, destroying the textural contrast we worked so hard to achieve.
Perfect Pairings for a Party Spread
Pickle poppers are bold, salty, and acidic, so they pair best with dishes that offer a bit of crunch or sweetness. Serve them as a tangy precursor to an Easter Sunday appetizer spread or alongside a cooling Asian coleslaw to balance the richness of the bacon fat.
If you’re hosting a summer bash, these poppers are the ultimate companion to refreshing summer cocktails or a frosty raspberry colada. For a more substantial meal, they act as a fantastic “side” to a light orzo salad or a vibrant summer orzo pasta salad. If you love the flavor profile, you might also enjoy snacking on dill pickle saltines between rounds!
Common Questions About This Savory Snack
Absolutely! With high protein from the bacon and low carbs from the pickles and cream cheese, they are a staple for low-carb and ketogenic diets.
Yes! Air fry at 400°F (200°C) for 12-15 minutes. The high-velocity air creates incredibly crispy bacon, just be sure not to overcrowd the basket so the edges can char evenly.
The secret is to use whipped cream cheese and to wrap the bacon in a tight, overlapping spiral. This creates a pressurized seal that keeps the cheese core contained while it melts.
Always choose refrigerated dill spears. They have a higher water content and better cellular structure, which prevents them from becoming mushy during the high-heat roasting process.
This usually happens if the bacon isn’t shingled (overlapped) enough or if it’s too thick. Ensure you wrap the bacon tightly and start/stop the wrap on the same side of the pickle.
The Ultimate Pickle Poppers Recipe Card
Pickle Poppers with Crispy Bacon and Whipped Cream Cheese
Ingredients
Equipment
Method
- Pat the dill pickle spears with paper towels until completely dry to ensure the bacon crisps properly.
- Spread a generous layer of whipped cream cheese into the center of each spear and sprinkle with half the cracked black pepper.
- Spiral one slice of bacon around each pickle spear, shingling the edges so the cheese is sealed inside.
- Place on a wire rack over a baking sheet. Bake at 425°F (220°C) for 18-22 minutes until bacon is rendered and edges are mahogany brown.
- Let rest for 2 minutes, then top with emerald green chive flakes and remaining pepper. Serve with ranch dip.
Notes
For extra heat, add a slice of jalapeño inside the bacon wrap.

Join the Pickle Revolution!
Once you master the art of the perfect bacon-wrapped pickle popper, you’ll never go back to basic appetizers. The combination of that steaming, melted core and the charred mahogany bacon is a culinary triumph that looks just as good as it tastes. If you make these, I want to hear about it! Leave a comment below with your favorite dipping sauce or any creative twists you added.
Don’t forget to follow me on Pinterest for more visually stunning recipe inspiration and share your own recreations using our hashtag. Happy cooking!